Using Azure Active Directory Roles in a Python app
Azure Active Directory application roles help you implement role-based access control (RBAC) in your applications. In this post, I’ll cover how to work with them. I’ll be using a simple Flask app to demonstrate, but the important bits happen in a few key API calls, so this method is transferable to other environments.
Specifically, I will cover how to:
- create an app in Azure AD
- create roles within the app
- assign users to those roles from the Azure portal
- retrieve the roles assigned to a user signed in to the app
As mentioned, I’ll be using a barebones Flask app in this post. You can download it
here and follow along. You’ll want to copy
resources/config.env.example to resources/config.env and fill in the values below
as we proceed through Azure AD. To start, TENANT_NAME is found on the main page
of Azure Active Directory and looks like *.onmicrosoft.com.
If you’re already familiar with creating apps in Azure AD, you can skip the next section, continuing with Create roles within the app.
Create an app in Azure AD #
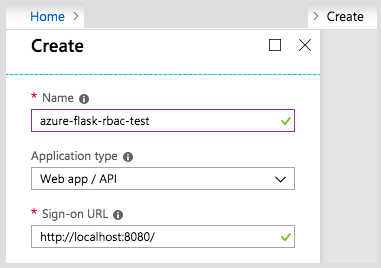
In the Azure portal, open Azure Active Directory and click on App registrations,
followed by New application registration.
On the next screen, choose an app name. You will need this later.
Select Web app / API as your application type, and enter the sign-on URL.

If you’re using the sample app linked above, you can put
http://localhost:8080/ as the sign-on URL. Also, in your config.env,
set APP_NAME to the app name you just chose.
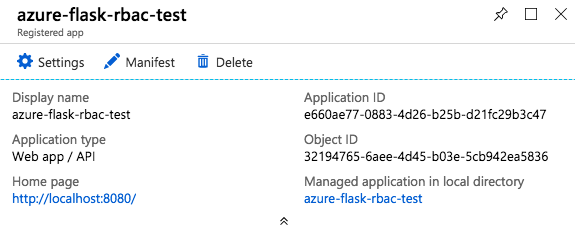
After you click Create, you will see the card for your app as below with a couple more values:

In your config.env, APP_OBJECT_ID is the value ‘Object ID’ on this card, and
CLIENT_ID is the value ‘Application ID’.
Now, click on Settings to open the right blade, and then Keys. Fill in a name
for the description of the key, choose a validity period, and then click Save.
After saving, the value will be displayed, but only once, so copy it somewhere.
This is CLIENT_SECRET in config.env. Keep it secret, keep it safe, don’t commit
it to your repos.

Click the X to close the Keys blade.
Finally, configure the Reply URLs pane. If you’re using the accompanying sample app,
fill in http://localhost:8080/get_a_token. Save this configuration.
Create roles within the app #
Back on the app card, click on Manifest to open the app’s manifest. This is
where you’ll add the JSON to create the roles within the app.
At the top of the manifest object, there’s an empty array called appRoles.
Every object in this array represents a role, and has this format:
{
    "allowedMemberTypes": [
      "User"
    ],
    "description": "[Role description]",
    "displayName": "[Role display name]",
    "id": "[GUID]",
    "isEnabled": true,
    "value": "[Role internal name]"
}
Attribute by attribute:
allowedMemberTypescan contain either"Application"or"User". In this post we’re only concerned with"User"roles. In the last section, I have a link to a post which goes further into the RBAC features of Azure AD.descriptionis a free text explanation of the role.displayNameis a user-facing name of the role.idis a GUID that needs to be generated for each role.isEnabledis a boolean flag.valueis the internal name of the role.
Here’s an example role:
{
    "allowedMemberTypes": [
      "User"
    ],
    "description": "Administrators can perform any action in the application",
    "displayName": "Administrator",
    "id": "c7778007-fb25-4675-90ea-f11f8cec2983",
    "isEnabled": true,
    "value": "admin"
}
Create your role objects, and add them inside the appRoles array, as in the
following excerpt where I create two:
{
  "appId": "e660ae77-0883-4d26-b25b-d21fc29b3c47",
  "appRoles": [
    {
        "allowedMemberTypes": [
            "User"
        ],
        "description": "Administrators can perform any action in the application",
        "displayName": "Administrator",
        "id": "c7778007-fb25-4675-90ea-f11f8cec2983",
        "isEnabled": true,
        "value": "admin"
    },
    {
        "allowedMemberTypes": [
            "User"
        ],
        "description": "Analysts can perform actions against their own cases",
        "displayName": "Analyst",
        "id": "0282f32f-4148-49f7-aa9a-b6124d2e24c4",
        "isEnabled": true,
        "value": "analyst"
    }
  ],
  "availableToOtherTenants": false,
  "displayName": "azure-flask-rbac-test",
  "...": "..."
}
Save the manifest.
Assign users to roles #
On the main app card, click on the link under
‘Managed application in local directory’. From here, select Users and groups.
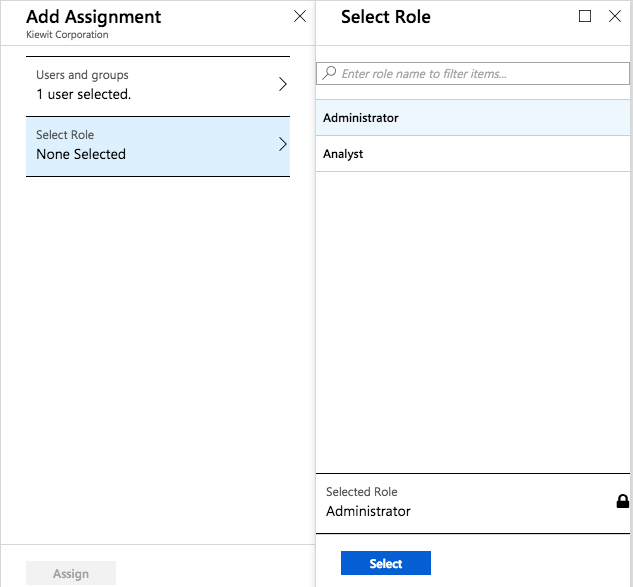
If your account is already added to the application with ‘Default Access’ as the
role, delete this entry by checking the box and clicking Remove. Now, click on
Add user. On the next page, you can select a user and then a role to assign to them.
If you have Azure Active Directory Premium, you can also select Active Directory
groups here and assign roles to them. Note the displayName from your role objects here.

Select and assign the role.
Retrieve assigned roles and map them to your app’s roles #

To get application role of a logged in user, there are three steps:
- get the list of
appRoleIds in the current user’s role assignments, filtered to the current app’s name - get the list of
appRoleobjects from the current app’s manifest, and - intersect the lists
For 1., you can perform a GET against the endpoint
https://graph.microsoft.com/beta/me/appRoleAssignments/ with the logged in user’s access token,
as in the sample app’s get_user_role_assignment() function. The response looks like this:
{
    "@odata.context": "https://graph.microsoft.com/beta/$metadata#appRoleAssignments",
    "value": [
        {
            "...": "..."
        },
        {
            "id": "U36YBH65XEe6YC9iTvLiuhToEQuOzYdNvG3xzXz--Mw",
            "creationTimestamp": null,
            "appRoleId": "c7778007-fb25-4675-90ea-f11f8cec2983",
            "principalDisplayName": "Michael.Ayoub",
            "principalId": "04987e53-b97e-475c-ba60-2f624ef2e2ba",
            "principalType": "User",
            "resourceDisplayName": "azure-flask-rbac-test",
            "resourceId": "72483e5f-10cf-4a99-af7c-369198e898a4"
        },
        {
            "...": "..."
        }
    ]
}
The resourceDisplayName is the app name from earlier, so you will filter on
this attribute in your application. The appRoleId is the GUID assigned to the
app role in the manifest.
Speaking of the manifest, for 2., you can perform a GET against the endpoint
https://graph.microsoft.com/beta/applications/<app object id> with the ‘Object ID’
(config.env’s APP_OBJECT_ID) from above and the same access token. In the sample
app, this happens in the get_app_roles() function. The response
looks like this, essentially an expanded form of the manifest:
{
    "@odata.context": "https://graph.microsoft.com/beta/$metadata#applications/$entity",
    "...": "...",
    "appRoles": [
        {
            "allowedMemberTypes": [
                "User"
            ],
            "description": "Analysts can perform actions against their own cases",
            "displayName": "Analyst",
            "id": "0282f32f-4148-49f7-aa9a-b6124d2e24c4",
            "isEnabled": true,
            "origin": "Application",
            "value": "analyst"
        },
        {
            "allowedMemberTypes": [
                "User"
            ],
            "description": "Administrators can perform any action in the application",
            "displayName": "Administrator",
            "id": "c7778007-fb25-4675-90ea-f11f8cec2983",
            "isEnabled": true,
            "origin": "Application",
            "value": "admin"
        }
    ],
    "...": "..."
}
The id attribute of each element of the appRoles array is the same GUID from
the previous call.
For 3., then, you can determine the logged in user’s applicable roles by compiling
the appRoleIds from the role assignment call where resourceDisplayName is equal
to your current app, and query the appRoles array for the application where the ids
of the inner objects are on the list, as in the second half of the sample
app’s get_user_role_assignment() function.
At this point in a real Flask app, you could combine the role information with a function decorator on your view functions to implement controls, or forward the role names to a downstream system, or both.
Further Reading #
The following links go into more detail on Azure AD app roles:
- Defining permission scopes and roles offered by an app in Azure AD, which also covers Application
permissions (
allowedMemberTypesbeing"Application") - Using Group Claims in Azure Active Directory and Application roles / Manage Identity in Multitenant Applications, which cover group claims as well
- Azure Active Directory application model, an excerpt from the book Modern Authentication with Azure Active Directory for Web Applications